As energy efficiency and smart power management become increasingly important, DIN rail energy meters are widely used in residential and commercial electrical systems. These compact devices allow users to monitor electricity consumption in real time and optimize energy usage.
However, proper installation is essential to ensure accurate measurement, system safety, and long-term reliability. In this guide, we explain how to install a DIN rail energy meter step by step, including wiring, CT clamp setup, and smart monitoring configuration.
What Is a DIN Rail Energy Meter?
A DIN rail energy meter is a compact monitoring device installed inside an electrical distribution board. It measures key parameters such as voltage, current, power consumption, and energy usage over time.
Modern energy meters often include wireless connectivity, allowing users to access real-time data through mobile applications or cloud platforms.
For example, a wifi din rail energy meter single phase can provide real-time energy data, helping homeowners and small businesses better understand and manage electricity usage.
Why Proper Installation Matters
Correct installation is critical for several reasons:
- Ensures accurate energy measurement
- Prevents electrical hazards
- Enables stable communication and monitoring
- Extends the lifespan of the device
Improper installation can lead to incorrect readings, unstable performance, or even safety risks.
Step 1: Turn Off the Main Power Supply
Before installation, always switch off the main circuit breaker.
Working with live electrical systems can cause serious injury or damage. Ensuring the power is off is the first and most important safety step.
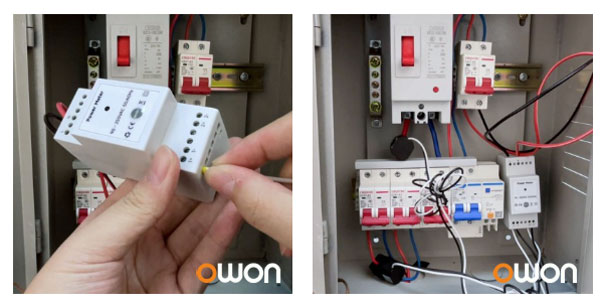
Step 2: Mount the Meter on the DIN Rail
Install the energy meter securely onto the DIN rail inside the electrical panel.
DIN rail mounting offers:
- Standardized installation
- Space-saving design
- Easy integration with other devices
Make sure the device is properly fixed and aligned.
Step 3: Connect Power Supply and Wiring
Connect the live (L) and neutral (N) wires according to the wiring diagram provided.
Typical specifications for single-phase meters include:
- Operating voltage: 90–250VAC
- Frequency: 50/60Hz
Ensure:
- Correct polarity
- Secure terminal connections
- No loose wiring
Incorrect wiring may result in inaccurate readings or device malfunction.
Step 4: Install the CT Clamp Correctly
The CT clamp (current transformer) measures the current flowing through the conductor.
Important points:
- Follow the arrow direction marked on the clamp (P1 → P2)
- Ensure the clamp fully encloses the cable
- Install on the correct phase
The direction of the CT clamp determines how energy is measured:
- Same direction → energy consumption
- Opposite direction → energy production
Incorrect orientation can lead to reversed or inaccurate data.
Step 5: Power On and Configure the Device
After completing installation:
- Turn on the main power
- Check LED indicators for device status
- Connect the meter via a mobile app
Modern smart meters support:
- Real-time energy monitoring
- Historical data tracking
- Remote control (for relay models)
Smart Energy Monitoring with WiFi Connectivity
With the development of IoT technology, energy meters are no longer limited to basic measurement. A tuya wifi din rail energy meter can connect to smart home systems and cloud platforms, enabling advanced features such as:
- Remote monitoring through mobile apps
- Energy consumption analysis (daily, monthly trends)
- Integration with other smart devices
- Automation for energy efficiency
For example, some manufacturers such as OWON provide WiFi-enabled DIN rail energy meters that support real-time monitoring and integration with smart home platforms, making energy management more efficient and accessible.
These solutions are widely used in:
- Smart homes
- Commercial energy monitoring systems
- Solar and energy storage applications
Common Installation Mistakes to Avoid
To ensure accurate and reliable operation, avoid the following:
- Installing without turning off power
- Incorrect CT clamp direction
- Loose or improper wiring
- Ignoring wiring diagrams
- Incorrect phase matching
Attention to detail during installation is key to achieving accurate energy monitoring.
Conclusion
Installing a DIN rail energy meter is a straightforward process when following the correct steps. From wiring and CT clamp installation to smart configuration, each stage plays a critical role in system performance.
As smart energy solutions continue to evolve, integrating WiFi-enabled meters allows users to gain deeper insights into energy consumption and improve efficiency across residential and commercial environments.